The RecyclerView widget is meant to replace functionalities of ListView and GridView.
Let’s get down to business!
1. Gradle dependency
First we will add a few dependencies to our gradle.build.
dependencies {
    compile 'com.android.support:appcompat-v7:22.0.0'
    compile 'com.android.support:recyclerview-v7:21.0.3'
    compile 'com.jakewharton:butterknife:6.0.0'
}
2. Basic setup
Now that we have access to RecyclerView, let’s add it to our main activity.
public class MainActivity extends ActionBarActivity {

    @InjectView(R.id.recycler_view_holder)
    public FrameLayout recyclerViewHolder;

    @InjectView(R.id.toolbar)
    public Toolbar toolbar;

    private RecyclerView recyclerView;

    @Override
    protected void onCreate(Bundle savedInstanceState) {
        super.onCreate(savedInstanceState);

        setContentView(R.layout.activity_main);
        ButterKnife.inject(this);

        setSupportActionBar(toolbar);

        recyclerView = new RecyclerView(this);
        recyclerView.setLayoutManager(new LinearLayoutManager(this));

        recyclerViewHolder.addView(recyclerView);
    }
}
`activity_main.xml`
<?xml version="1.0" encoding="utf-8"?>
<LinearLayout xmlns:android="http://schemas.android.com/apk/res/android"
   xmlns:app="http://schemas.android.com/apk/res-auto"
   xmlns:tools="http://schemas.android.com/tools"
   android:layout_width="match_parent"
   android:layout_height="match_parent"
   android:orientation="vertical"
   tools:context=".MainActivity">

   <android.support.v7.widget.Toolbar
       android:id="@+id/toolbar"
       style="@style/Toolbar"
       android:layout_width="match_parent"
       android:layout_height="wrap_content"
       android:minHeight="?attr/actionBarSize"
       app:contentInsetLeft="8dp"
       app:contentInsetStart="8dp"
       app:popupTheme="@style/ThemeOverlay.AppCompat.Light"
       app:theme="@style/ThemeOverlay.AppCompat.ActionBar"
       tools:ignore="UnusedAttribute">

       <TextView
           android:layout_width="wrap_content"
           android:layout_height="wrap_content"
           android:fontFamily="sans-serif-light"
           android:text="@string/app_name"
           android:textColor="#fff"
           android:textSize="20sp"
           android:textStyle="bold" />

   </android.support.v7.widget.Toolbar>

       <FrameLayout
           android:id="@+id/recycler_view_holder"
           android:layout_width="match_parent"
           android:layout_height="match_parent">

       </FrameLayout>

</LinearLayout>
2. LayoutManager
RecyclerView.LayoutManager is a class responsible for laying out the RecyclerView children. ‘com.android.support:recyclerview-v7:21.0.3’ gives us access to 3 different layout policies:
- `LinearLayoutManager` – lays out items in similar way to ListView
- `GridLayoutManager` – lays out items in a grid (GridView)
- `StaggeredGridLayoutManager` – similar to GridLayoutManager, but in this case cells don’t have to keep the same size
If the presented LayoutManagers are not enough for you, consider using some third-party library like TwoWayView.
3. Adapter
RecyclerView.Adapter is responsible for chaining the model to its visual representation. It may sound similar to adapter class and its extensions used for ListView or GridView, however, there are few differences.
Let’s create our own adapter which will operate on a list of tasks.
public class MainActivity extends ActionBarActivity {

    private List<Task> tasks = new LinkedList<Task>();
    private TaskAdapter taskAdapter;

    @Override
    protected void onCreate(Bundle savedInstanceState) {
        ...

        tasks.add(new Task("Wake up"));
        tasks.add(new Task("Go to work"));
        tasks.add(new Task("Make a coffee"));
        tasks.add(new Task("Go to standup"));
        tasks.add(new Task("Make a coffee"));
        tasks.add(new Task("Spend some time in chillout room"));
        tasks.add(new Task("Make a coffee"));
        tasks.add(new Task("Go home"));
        tasks.add(new Task("Make a coffee"));
        tasks.add(new Task("Sleep"));

        recyclerView.setAdapter(taskAdapter = new TaskAdapter());

        ...
    }

    private class TaskAdapter extends RecyclerView.Adapter {

        @Override
        public TaskRowHolder onCreateViewHolder(ViewGroup parent, int viewType) {
            return new TaskRowHolder(getLayoutInflater().inflate(R.layout.view_task_row, parent, false));
        }

        @Override
        public void onBindViewHolder(TaskRowHolder holder, int position) {
            holder.setTask(tasks.get(position), position);
        }

        @Override
        public int getItemCount() {
            return tasks.size();
        }
    }

    private class Task {
        String name;

        public Task(String name) {
            this.name = name;
        }
    }
}
As you can see, we had to implement 3 methods.
- `getItemCount()` – returns amount of tasks in our application
- `onCreateViewHolder()` – creates and returns row ViewHolder
- `onBindViewHolder()` – updates ViewHolder with the item on given position
Here is how our TaskRowHolder and its layout will look like:
class TaskRowHolder extends RecyclerView.ViewHolder {

    private TextView taskNameLabel;

    private Task task;
    private int taskNumber;

    public TaskRowHolder(View itemView) {
        super(itemView);
        taskNameLabel = ButterKnife.findById(itemView, R.id.task_name);
    }

    public void setTask(Task task, int taskNumber) {
        this.task = task;
        this.taskNumber = taskNumber;
        taskNameLabel.setText(task.name);
    }
}
`view_task_row.xml`
<?xml version="1.0" encoding="utf-8"?>
<android.support.v7.widget.CardView xmlns:android="http://schemas.android.com/apk/res/android"
   xmlns:card_view="http://schemas.android.com/apk/res-auto"
   android:id="@+id/card_view"
   android:layout_width="match_parent"
   android:layout_height="wrap_content"
   android:layout_gravity="center"
   android:layout_margin="4dp"
   card_view:cardCornerRadius="4dp">

   <RelativeLayout
       android:layout_width="match_parent"
       android:layout_height="wrap_content"
       android:layout_margin="4dp"
       android:orientation="horizontal"
       android:padding="8dp">

       <ImageView
           android:id="@+id/logo"
           android:layout_width="48dp"
           android:layout_height="48dp"
           android:layout_centerVertical="true"
           android:src="@drawable/schibsted" />

       <TextView
           android:id="@+id/task_name"
           android:layout_width="match_parent"
           android:layout_height="wrap_content"
           android:layout_centerVertical="true"
           android:layout_marginLeft="8dp"
           android:layout_toRightOf="@id/logo"
           android:fontFamily="sans-serif-light"
           android:textSize="18sp" />
   </RelativeLayout>
</android.support.v7.widget.CardView>
`Remember to add CardView dependency to build.gradle.`
dependencies {
    'com.android.support:cardview-v7:21.0.3''
}
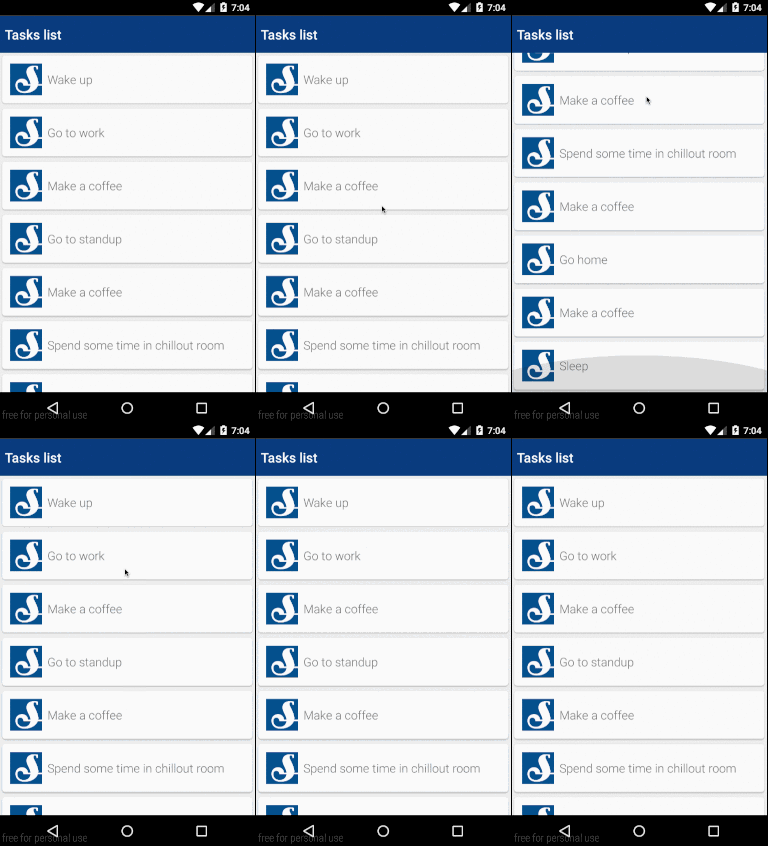
So let’s check the result.
4. ItemDecoration
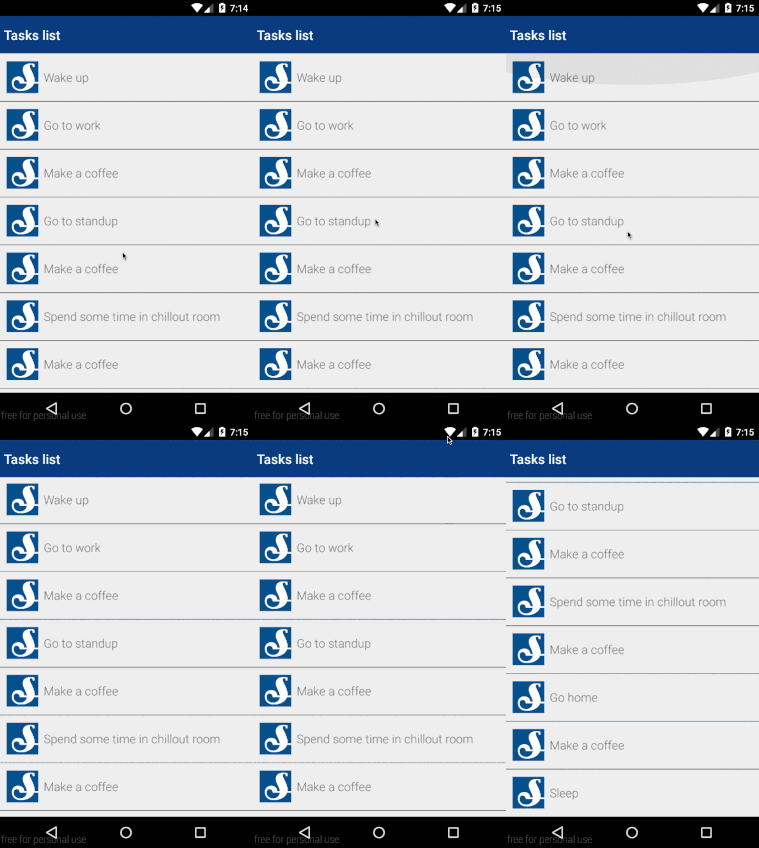
As you can see, the rows on the list are separated by CardView look. The other option would be to use RecyclerView.ItemDecoration.
First we will prepare our TaskRowItemDecoration (code used below is available in Android demos).
public class MainActivity extends ActionBarActivity {

    ...

    @Override
    protected void onCreate(Bundle savedInstanceState) {

        ...

        recyclerView.addItemDecoration(new TaskRowItemDecoration(getDrawable(R.drawable.task_divider)));
    }

    public class TaskRowItemDecoration extends RecyclerView.ItemDecoration {

        private Drawable dividerDrawable;

        public TaskRowItemDecoration(Drawable drawable) {
            this.dividerDrawable = drawable.mutate();
        }

        @Override
        public void onDrawOver(Canvas canvas, RecyclerView parent, RecyclerView.State state) {
            for (int i = 0; i < parent.getChildCount(); i++) {
                View child = parent.getChildAt(i);

                RecyclerView.LayoutParams params = (RecyclerView.LayoutParams) child.getLayoutParams();

                int top = child.getBottom() + params.bottomMargin;
                int bottom = top + dividerDrawable.getIntrinsicHeight();

                dividerDrawable.setBounds(parent.getPaddingLeft(), top, parent.getWidth() - parent.getPaddingRight(), bottom);
                dividerDrawable.draw(canvas);
            }
        }
    }
}
`CardView also needs to be removed temporarily to show the effect of using ItemDecoration.`
`task_divider.xml`
<?xml version="1.0" encoding="utf-8"?>
<shape xmlns:android="http://schemas.android.com/apk/res/android"
   android:shape="rectangle">
   <solid android:color="#444" />
   <size android:width="1dp" android:height="1dp" />
</shape>
To add dividers, we had to implement public void onDrawOver(Canvas canvas, RecyclerView parent, RecyclerView.State state). method
- `canvas` – destination canvas
- `parent` – our recyclerView instance
- `state` – state of RecyclerView
Result
Once again, you can find some libraries which will help you with the item decoration (e.g FlexibleDivider)
5. Checkable items
So far, our list doesn’t have any behaviour. We will change that by making the rows checkable.
First, we will add a CheckBox widget to our view_task_row.xml
`view_task_row.xml`
<?xml version="1.0" encoding="utf-8"?>
<android.support.v7.widget.CardView xmlns:android="http://schemas.android.com/apk/res/android"
   xmlns:card_view="http://schemas.android.com/apk/res-auto"
   android:id="@+id/card_view"
   android:layout_width="match_parent"
   android:layout_height="wrap_content"
   android:layout_gravity="center"
   android:layout_margin="4dp"
   card_view:cardCornerRadius="4dp">

   <RelativeLayout
       android:layout_width="match_parent"
       android:layout_height="wrap_content"
       android:layout_margin="4dp"
       android:orientation="horizontal"
       android:padding="8dp">

       <ImageView
           android:id="@+id/logo"
           android:layout_width="48dp"
           android:layout_height="48dp"
           android:layout_centerVertical="true"
           android:src="@drawable/schibsted" />

       <TextView
           android:id="@+id/task_name"
           android:layout_width="match_parent"
           android:layout_height="wrap_content"
           android:layout_centerVertical="true"
           android:layout_marginLeft="8dp"
           android:layout_toLeftOf="@id/checkbox"
           android:layout_toRightOf="@id/logo"
           android:fontFamily="sans-serif-light"
           android:textSize="18sp" />

       <CheckBox
           android:id="@+id/checkbox"
           android:layout_width="wrap_content"
           android:layout_height="wrap_content"
           android:layout_alignParentRight="true"
           android:layout_centerVertical="true"
           android:layout_marginLeft="8dp" />

   </RelativeLayout>
</android.support.v7.widget.CardView>
Now we need to prepare our TaskRowHolder to send events upon checkbox state change. For this purpose we will use Otto event bus.
Add gradle dependecy for Otto.
dependencies {
    ....
    compile 'com.squareup:otto:1.3.+'
    ...
}
Define the event class which will hold information about the changed item.
public class TaskCheckStateChangedEvent {
    public boolean isChecked;
    public Task task;

    public TaskCheckStateChangedEvent(Task task, boolean isChecked) {
        this.task = task;
        this.isChecked = isChecked;
    }
}
Define BUS instance in our MainActivity.
public class MainActivity extends ActionBarActivity {
    private static final Bus BUS = new Bus();
    ...

    @Override
    protected void onResume() {
        super.onResume();
        BUS.register(taskAdapter);
    }

    @Override
    protected void onStop() {
        super.onStop();
        BUS.unregister(taskAdapter);
    }
    ...
}
Post event upon TaskViewHolder checkbox state change.
class TaskRowHolder extends RecyclerView.ViewHolder {

    private TextView taskNameLabel;
    private CheckBox checkBox;

    private Task task;

    public TaskRowHolder(View itemView) {
       super(itemView);
       taskNameLabel = ButterKnife.findById(itemView, R.id.task_name);
       checkBox = ButterKnife.findById(itemView, R.id.checkbox);
       checkBox.setOnCheckedChangeListener(new CompoundButton.OnCheckedChangeListener() {
           @Override
           public void onCheckedChanged(CompoundButton buttonView, boolean isChecked) {
               BUS.post(new TaskCheckStateChangedEvent(task, isChecked));
           }
       });
    }

    public void setTask(Task task) {
        this.task = task;
        taskNameLabel.setText(task.name);
    }

    public void setChecked(boolean checked) {
        checkBox.setChecked(checked);
    }
}
Respond to Otto events with `taskAdapter`.
private class TaskAdapter extends RecyclerView.Adapter {

    private Set selectedTasks = new HashSet();

    ...

    @Override
    public void onBindViewHolder(TaskRowHolder holder, int position) {
        ...
        holder.setChecked(selectedTasks.contains(task));
    }

    @Subscribe
    public void onTaskCheckStateChangedEvent(TaskCheckStateChangedEvent event){
        if (event.isChecked) {
            selectedTasks.add(event.task);
        } else {
            selectedTasks.remove(event.task);
        }
    }
}
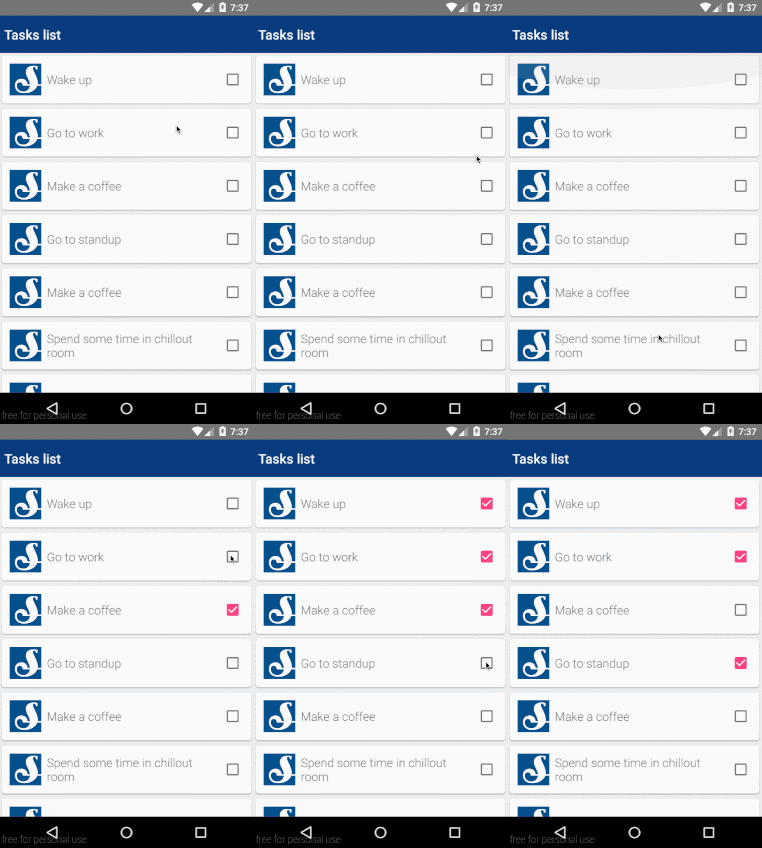
Result
6. Removing items
As the possibility to check/uncheck tasks is done, we will work on the removal feature.
Let’s start by defining xml file with our menu.
`main_menu.xml`
<?xml version="1.0" encoding="utf-8"?>
<menu xmlns:android="http://schemas.android.com/apk/res/android"
   xmlns:app="http://schemas.android.com/apk/res-auto">
   <item
       android:id="@+id/action_delete"
       android:orderInCategory="100"
       app:showAsAction="always"
       android:title="Delete"/>
</menu>
public class MainActivity extends ActionBarActivity {

    @Override
    public boolean onCreateOptionsMenu(Menu menu) {
        getMenuInflater().inflate(R.menu.main_menu, menu);
        return super.onCreateOptionsMenu(menu);
    }

    @Override
    public boolean onOptionsItemSelected(MenuItem item) {
        switch (item.getItemId()) {
            case R.id.action_delete:
                taskAdapter.deleteCheckedItems();
                break;
            default:
                return super.onOptionsItemSelected(item);
        }
        return true;
    }
    ...
}
Now the code for items removal.
private class TaskAdapter extends RecyclerView.Adapter {

    ...

    public void deleteCheckedItems() {
            for (Task task : selectedTasks) {
                taskAdapter.notifyItemRemoved(tasks.indexOf(task));
                tasks.remove(task);
            }
            selectedTasks.clear();
        }
}
7. Animating RecycleView item addition
We have the possibility to remove items but their addition to the ReyclerView is still hardcoded. Let’s change that.
We will use an additional library for FloatingButoon.
dependencies {
    compile 'com.getbase:floatingactionbutton:1.9.0'
}
Add floating button to main activity.
`activity_main.xml`
<?xml version="1.0" encoding="utf-8"?>
<LinearLayout xmlns:android="http://schemas.android.com/apk/res/android"
   xmlns:app="http://schemas.android.com/apk/res-auto"
   xmlns:tools="http://schemas.android.com/tools"
   android:layout_width="match_parent"
   android:layout_height="match_parent"
   android:orientation="vertical"
   tools:context=".MainActivity">

   <android.support.v7.widget.Toolbar
       android:id="@+id/toolbar"
       style="@style/Toolbar"
       android:layout_width="match_parent"
       android:layout_height="wrap_content"
       android:minHeight="?attr/actionBarSize"
       app:contentInsetLeft="8dp"
       app:contentInsetStart="8dp"
       app:popupTheme="@style/ThemeOverlay.AppCompat.Light"
       app:theme="@style/ThemeOverlay.AppCompat.ActionBar"
       tools:ignore="UnusedAttribute">

       <TextView
           android:layout_width="wrap_content"
           android:layout_height="wrap_content"
           android:fontFamily="sans-serif-light"
           android:text="@string/app_name"
           android:textColor="#fff"
           android:textSize="20sp"
           android:textStyle="bold" />

   </android.support.v7.widget.Toolbar>

   <RelativeLayout
       android:layout_width="match_parent"
       android:layout_height="wrap_content">

       <FrameLayout
           android:id="@+id/recycler_view_holder"
           android:layout_width="match_parent"
           android:layout_height="match_parent">

       </FrameLayout>

       <com.getbase.floatingactionbutton.FloatingActionButton
           android:id="@+id/add_task"
           android:layout_width="wrap_content"
           android:layout_height="wrap_content"
           app:fab_colorNormal="#ff4081"
           app:fab_colorPressed="#FF6E9F"
app:fab_icon="@drawable/ic_fab_star"

           android:layout_alignParentBottom="true"
           android:layout_alignParentRight="true"
           android:layout_marginBottom="16dp"/>

   </RelativeLayout>


</LinearLayout>
`MainActivity`
public class MainActivity extends ActionBarActivity {

    ...

    @OnClick(R.id.add_task)
    public void addTask() {
        final EditText input = new EditText(this);

        new AlertDialog.Builder(this).setTitle("New task").setMessage("Please supply task name")
                .setView(input).setPositiveButton("Ok", new DialogInterface.OnClickListener() {
            public void onClick(DialogInterface dialog, int whichButton) {
                tasks.add(new Task(input.getText().toString()));
                taskAdapter.notifyItemInserted(tasks.size()-1);
            }
        }).setNegativeButton("Cancel", new DialogInterface.OnClickListener() {
            public void onClick(DialogInterface dialog, int whichButton) {
                // Canceled.
            }
        }).show();
    }
}
Now that we have the possibility to add items manually, we can remove this code.
tasks.add(new Task("Wake up"));
tasks.add(new Task("Go to work"));
tasks.add(new Task("Make a coffee"));
tasks.add(new Task("Go to standup"));
tasks.add(new Task("Make a coffee"));
tasks.add(new Task("Spend some time in chillout room"));
tasks.add(new Task("Make a coffee"));
tasks.add(new Task("Go home"));
tasks.add(new Task("Make a coffee"));
tasks.add(new Task("Sleep"));
Finally we are going to add an animation for ‘add task’ action.
Gradle dependency
dependencies {
    ...

    compile 'jp.wasabeef:recyclerview-animators:1.2.0@aar'
}
Now all we need to do is to set our ItemAnimator
public class MainActivity extends ActionBarActivity {

    ...

    @Override
    protected void onCreate(Bundle savedInstanceState) {

        ...

        recyclerView.setItemAnimator(new SlideInLeftAnimator());
    }
}
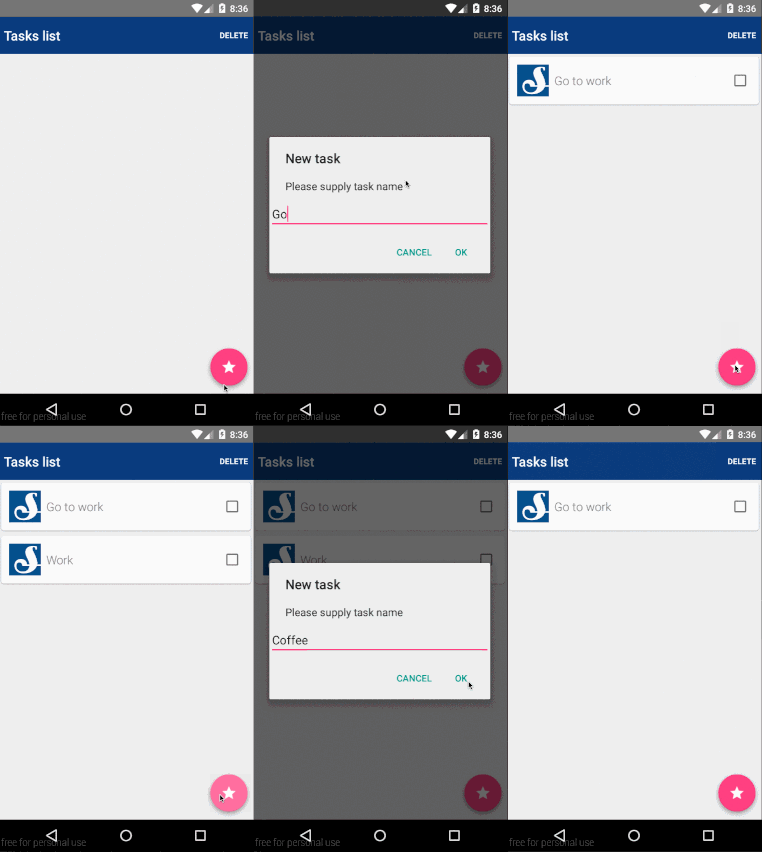
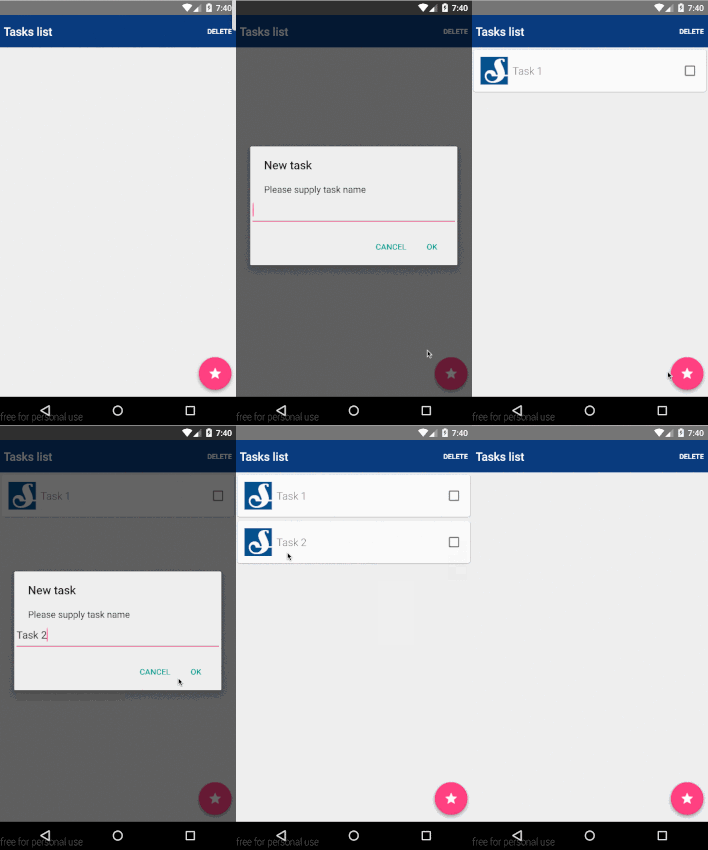
Result
8. Further extensions
As a final step we will add one more extension: the possibility to remove items with swipe gesture.
Get swipe to dismiss class SwipeToDismissTouchListener and add it to project with implementation shown below.
public class MainActivity extends ActionBarActivity {

    ...

    @Override
    protected void onCreate(Bundle savedInstanceState) {

        ...

        swipeToDismissTouchListener = new SwipeToDismissTouchListener(recyclerView, new SwipeToDismissTouchListener.DismissCallbacks() {
            @Override
            public SwipeToDismissTouchListener.SwipeDirection canDismiss(int position) {
                return SwipeToDismissTouchListener.SwipeDirection.RIGHT;
            }
            @Override
            public void onDismiss(RecyclerView view, List dismissData) {
                for (SwipeToDismissTouchListener.PendingDismissData data : dismissData) {
                    tasks.remove(data.position);
                    taskAdapter.notifyItemRemoved(data.position);
                }
            }
        });
        recyclerView.addOnItemTouchListener(swipeToDismissTouchListener);
    }
}
Result
Check my Github repo for full code of the Task Manager.
`Thanks for reading!`


